Hello world application (from source to executable application)
Table of contents
Gradle task dependency tree
Run the project
$ ./gradlew run

> Task :run
Hello world.
Adjust Logging Level
The run tasks will also compile the code and perform all necessary things. It performs three more tasks:
Using the
-i(or--info) logging option, Gradle will produce more information.$ ./gradlew run -i ... > Configure project : Evaluating root project 'demo' using build file 'build.gradle'. All projects evaluated. Selected primary task 'run' from project : Tasks to be executed: [task ':compileJava', task ':processResources', task ':classes', task ':run'] Tasks that were excluded: [] :compileJava (Thread[Execution worker for ':',5,main]) started. ...Display Task Dependency Tree
Add the task tree plugin
plugins {
  id 'com.dorongold.task-tree' version '1.5'
}
Display the other tasks the
runtask depends on$ ./gradlew run taskTreeThe result shows an inverted tree, where the top nodes depend on the lower nodes
:run
\--- :classes
     +--- :compileJava
     \--- :processResources
The
runtask depends on theclassestask which depends on two more tasks.
Demo
Project Dependencies
Gradle tasks add functionality to Gradle. Dependencies add functionality to the project. Instead of re-inventing the wheel, we can leverage code developed by others and just focus on the task at hand.
List project dependencies
$ ./gradlew depThis is very useful to identify any conflicting dependencies
> Task :dependencies

...

testCompileClasspath - Compile classpath for source set 'test'.
+--- com.google.guava:guava:28.2-jre
|    +--- com.google.guava:failureaccess:1.0.1
|    +--- com.google.guava:listenablefuture:9999.0-empty-to-avoid-conflict-with-guava
|    +--- com.google.code.findbugs:jsr305:3.0.2
|    +--- org.checkerframework:checker-qual:2.10.0
|    +--- com.google.errorprone:error_prone_annotations:2.3.4
|    \--- com.google.j2objc:j2objc-annotations:1.3
\--- org.junit.jupiter:junit-jupiter-api:5.6.0
     +--- org.junit:junit-bom:5.6.0
     |    +--- org.junit.jupiter:junit-jupiter-api:5.6.0 (c)
     |    \--- org.junit.platform:junit-platform-commons:1.6.0 (c)
     +--- org.apiguardian:apiguardian-api:1.1.0
     +--- org.opentest4j:opentest4j:1.2.0
     \--- org.junit.platform:junit-platform-commons:1.6.0
          +--- org.junit:junit-bom:5.6.0 (*)
          \--- org.apiguardian:apiguardian-api:1.1.0

...

BUILD SUCCESSFUL in 769ms
1 actionable task: 1 executed
Package Project
Build the project
$ ./gradlew clean buildThis will produce a JAR file at
build/libs/demo.jarJAR is a simple ZIP file. Unzip it.
$ unzip build/libs/demo.jar -d temp
Archive:  build/libs/demo.jar
  creating: temp/META-INF/
 inflating: temp/META-INF/MANIFEST.MF
  creating: temp/demo/
 inflating: temp/demo/App.class
The
tempdirectory contains two folders and each folder will contain one file.$ tree temp temp ├── META-INF │ └── MANIFEST.MF └── demo └── App.class 2 directories, 2 filesThe
temp/META-INF/MANIFEST.MFfile is a text file created by one of the Gradle tasks.$ cat temp/META-INF/MANIFEST.MF Manifest-Version: 1.0The
demo/App.classfile is the compiled version (Bytecode) of the source file:src/main/java/demo/App.java.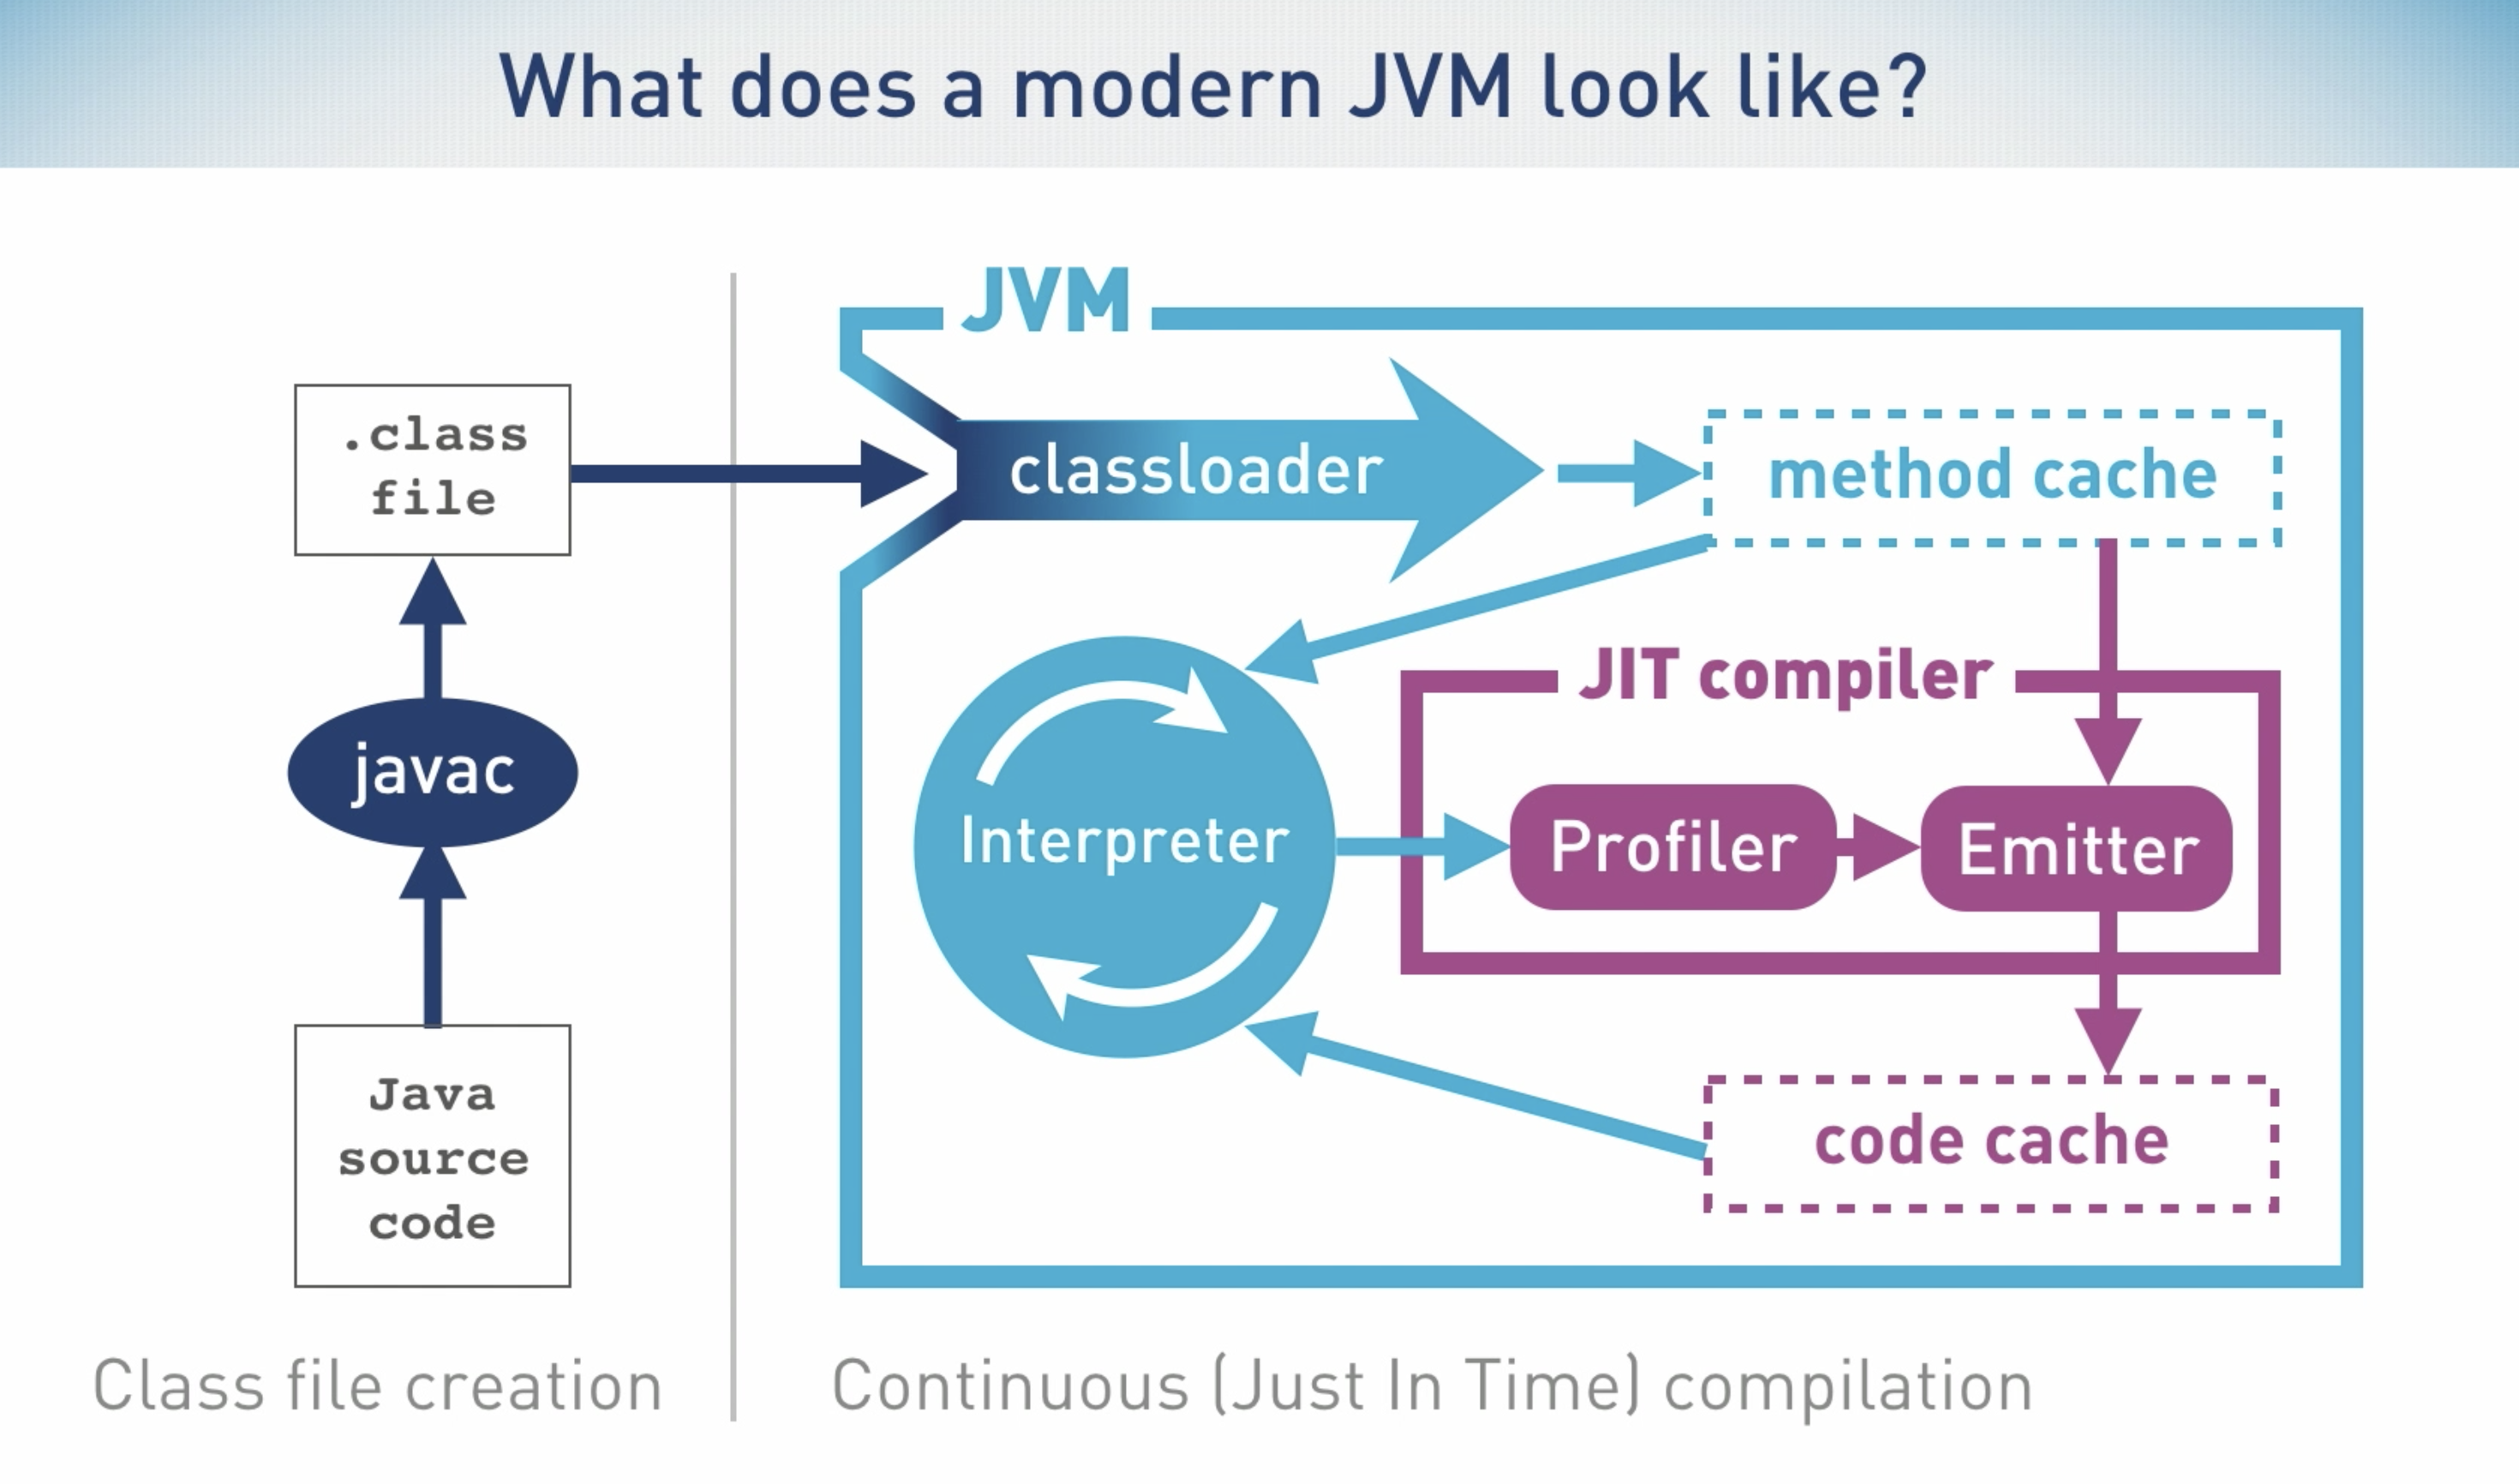 Image copied from: Theory: JVM Subsystems
The Bytecode produced when compiling this class can be viewed using the
javapcommand as shown next.$ ./gradlew build $ javap -c build/classes/java/main/demo/App.class Compiled from "App.java" public class demo.App { public demo.App(); Code: 0: aload_0 1: invokespecial #1 // Method java/lang/Object."<init>":()V 4: return public java.lang.String getGreeting(); Code: 0: ldc #7 // String Hello world. 2: areturn public static void main(java.lang.String[]); Code: 0: getstatic #9 // Field java/lang/System.out:Ljava/io/PrintStream; 3: new #15 // class demo/App 6: dup 7: invokespecial #17 // Method "<init>":()V 10: invokevirtual #18 // Method getGreeting:()Ljava/lang/String; 13: invokevirtual #22 // Method java/io/PrintStream.println:(Ljava/lang/String;)V 16: return }Alternatively, we can use the IntelliJ Jclasslib plugin.
Click on View > Show Bytecode with Jclasslib
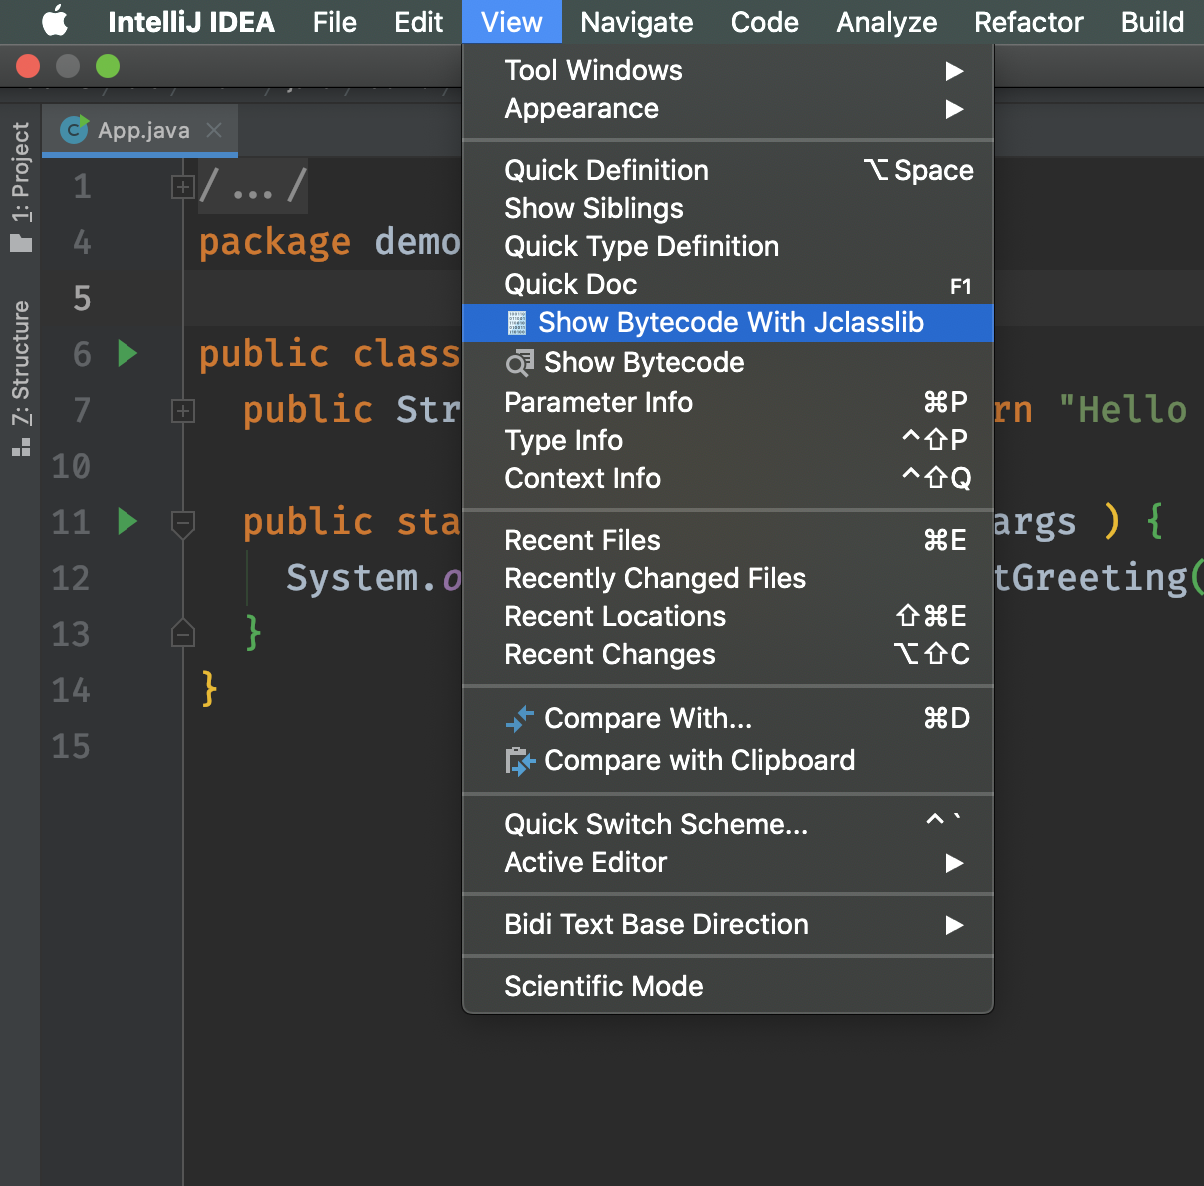
Expand Methods > main > Code

The section Internals: Bytecode Basics, part of the Optimizing Java O’Reilly Video Series, covers this topic in some depth and is a recommended follow up.
Run the application
$ java -jar build/libs/demo.jar
no main manifest attribute, in build/libs/demo.jar
This JAR is not yet an executable JAR. The
MANIFEST.MFis missing theMain-Classattribute. Java does not know where to go and which class to execute. Note that a project may contain hundreds if not thousands to classes. Java will look into theMANIFEST.MFfor theMain-Classattribute and will execute that.Configure the
jartaskFile:
build.gradlejar { manifest { attributes 'Main-Class': application.mainClassName } }Note that the above fragment is referring to another value defined elsewhere.
Build the project
$ ./gradlew clean buildRemove the
tempdirectory and unzip it again$ rm -rf temp $ unzip build/libs/demo.jar -d tempThe manifest now contains the
Main-Classattribute.$ cat temp/META-INF/MANIFEST.MF Manifest-Version: 1.0 Main-Class: demo.AppRun the application.
$ java -jar build/libs/demo.jarThis time, it should work.
Hello world.